Water mitigation jobs are hard. Not only is the on-site restoration difficult, but with documentation requirements getting tougher and tougher, getting paid for them has become difficult as well. With the biggest reason for getting pushback on water jobs being documentation, we sought to bridge that gap between doing the work and getting paid with Encircle Hydro, our water mitigation documentation feature within the Encircle app.
While there’s plenty to unpack about this feature, we wanted to focus here on the initial setup of water jobs in Encircle Hydro. After all, without knowing how to setup a job properly, people further down the line won’t know what to do or where to go on-site. Following our recent session with Mike Aho and Leah Vusich, here’s a quick overview of the Job Setup process in Encircle Hydro.
Step 1: Navigating to the Hydro Job Setup
First thing’s first — in order to setup your water mitigation documentation, you need to know how to navigate to the Hydro feature in our app. Once you open the Encircle app, you’ll need to open the current job that you’re on; this will take you to the job homescreen. Once you’re on this screen, you’ll see a Hydro button.
Once you click on this button, you’ll be taken to the Hydro homescreen with its various tabs. While all of these tabs will be important to you later on in your water mitigation job, for now we’re wanting to focus on the Job Setup tab, listed on the top left. On this tab, you’ll see a button that says “Start Here” — click this button to continue to the next step.
💡 Tip: Customize your task list!
Let’s face it, there’s no one size fits all in restoration; not every company has the same needs, and not every job has the same requirements. That’s why we factored in task list customization within Encircle Hydro.
If your company wants to have an organization-wide default task list, you can set that up at your company’s settings level. That way, your team doesn’t have to adjust your task list for every single job. This doesn’t lock you in to these selected tasks though — if you ever find yourself on a job that requires one of the tasks that’s been removed, you can easily activate it again for a specific job.
To customize your task list on a job by job basis, you need to just click the three dots in the top right corner of the Hydro homescreen. From there, you click on “Edit task list” and simply toggle on or off any of the tasks that are listed.
Step 2: Complete the Job Setup task list
Now it’s time to actually get the initial information in place for your water mitigation documentation. This Job Setup task list consists of 13 tasks total, although what you’re seeing may vary depending on your company’s settings. All of these tasks were created based on the S500 standards for best practices in drying, which makes completing them important in order to put your team in compliance with these standards. As you complete each task, it will get checked off so that you can see it has been completed.
💡 Tip: Divide and conquer your tasks!
Feeling overwhelmed by the number of tasks at hand, or simply eager to get to that actual restoring? Good news, you can actually have multiple techs using Encircle Hydro at the same time! Your Hydro Job Setup task list will be completed and updated in real-time, meaning you can all tackle different tasks without worrying about overlap.
Here are some of the tasks that you may want to prioritize completing:
Source of Loss and Category of Water
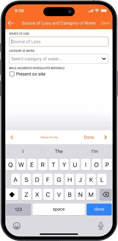 This is the first task that you’ll want to complete off of this list; it’s important that you gather this information to pre-emptively address any questions that the insurance company may have about the loss.
In addition to stating the source of loss and selecting the category of water, you can also note in this section if there is any mold or any hazardous materials on site. This will not only help keep your own team safe, but will also help inform any reviewer that there will likely be additional tasks due to such hazards.
Drying Chamber
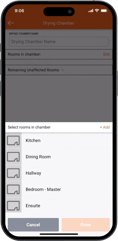 This next task is absolutely imperative to complete; setting up and documenting the drying chamber needs to be either the first or second task that you do for these jobs. Why? Because that’s what all of these other tasks will be based on!
If you’re not quite sure what a drying chamber is, it is defined as part of a room, a room, a series of rooms, a floor, or even an entire wing of a building that shares the same controlled air space. Once these rooms are identified, your team will likely seal them off from everything else in order to have a controlled environment optimized for drying.
Once you’ve created your drying chambers in real life, you’ll need to select the rooms in our app and give the chamber a name. You can then either complete the task, or you can add another chamber if necessary.
Exterior Reading
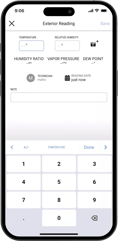 Although you’re drying the interior of the structure, it’s often still handy to note some readings for the exterior as well. This is because the exterior conditions might either help (or hinder) your drying process — knowing what’s going on outside could be an important factor in drying your structure properly.
Dry Standard
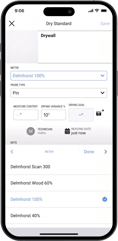 Different jobs have different types of materials that require drying — and each material is going to dry differently! It’s important to know what you’re trying to achieve during the drying process with each material.
In the Dry Standard task, your team will select the materials that are on the job. From there, they’ll need to set up their drying goals for the chosen materials so that they will know when it’s dry and they can move on.
Chamber Air Reading
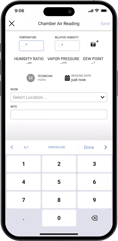 For this task, typically you’d just pick one room in the chamber in order to take an affected area reading; this one air reading tends to be good enough.
Room & Affected Area Dimensions
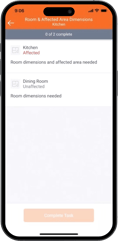 Indicating the room and affected area dimensions is important to do in order to move on to the Equipment Calculation task, which we recommend completing to ensure you have placed enough dehumidification and air movement.
Now that you have your rooms and drying chamber defined, you need to put in their dimensions in this task. To do so, you simply need to tap and put in the dimensions for each room.
Equipment Calculation
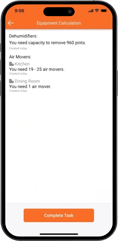 Now that you have all of the appropriate readings and dimensions from previous tasks, you can move on to the Equipment Calculation! This calculation is based on the S500 standard; and since it’s based on the best practice standards, it helps justify the equipment that you used for a job.
This calculator takes your affected area dimensions, and asks you a few questions about the drying factors related to your current job. Once you fill out the list of drying factors, the calculator will tell you exactly what equipment you need to dry the damage. Having this equipment calculation based on best practices will help ensure that you’re going to be very efficient at drying this loss, and prevents pushback from adjusters on your equipment charges.
Equipment Placement
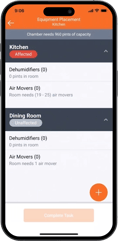 Now that you’ve completed the Equipment Calculation task, you can move on to this task and actually place the equipment that was suggested.
Back when your team was being onboarded into the Encircle app, you provided us with a list of all of the equipment that you have. Here’s where that list becomes really important! This task lists out all of the water mitigation equipment that your company has, which your techs can now go through.
Once the appropriate pieces of equipment have been selected, you can then complete the Dehumidifier Readings task as well.
Room Moisture Map
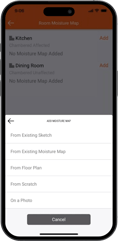 This task is more important to complete from a documentation rather than a drying perspective. Adjusters and anyone else reviewing the job will want to have this map to look at as a visual representation of what is happening on a job. Any additional clarity that your team can provide is one step closer to getting you paid!
You have several options to choose from to create this moisture map, including from an existing sketch, from an existing moisture map, from a floor plan, from scratch, or on a photo. These options act as a base for you to then draw on the water damage and show the placement of your equipment.
Step 3: Address any Alerts
As your techs go through and complete the Job Setup tasks, they may trigger the occasional Alert. Alerts are a system that we built into Encircle Hydro so that we can alert your team when a small issue is detected from the readings that you provide. It pinpoints small areas where we recognize that the job might turn sideways — because if you address these issues early, you’ll be able to prevent it becoming a big problem down the road.
If you missed some of these alerts as they appeared in real-time completing your Job Setup tasks, no stress! We have an entire other tab on the Hydro homescreen that shows both active and past alerts.
💡 Tip: Be aware of what’s out there!
Curious what the different Alerts are, and how to prepare for them? This handout explains the purpose of each one of them, as well as how to fix them!
Want to watch an Encircle Hydro demo on-demand? Check out our latest webinar for more information and updates on this feature.
 By: The Encircle Team